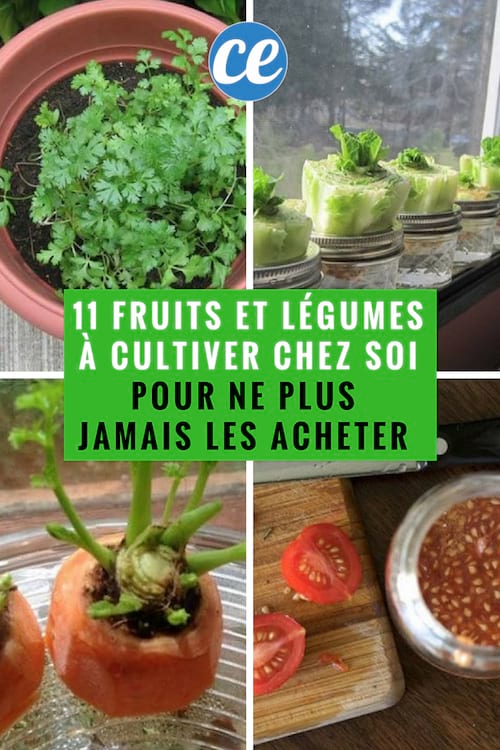
11 Fruits and Vegetables You Should Only Buy Once In Your Life If You Know These Tips
Tired of buying your fruits and vegetables at the supermarket?
It is true that vegetables are more and more expensive!
Would you like to grow your own vegetables?
But you think it's too complicated ... or you need a garden.
Well no, think again!
Fortunately, there are some simple tips for growing your own vegetables at home.
And it works whether we live in a city, in a small apartment or in the countryside on a huge farm.
Not only can you grow your vegetables anywhere, but it's super easy to do.
Carrots, salads, pineapples ... nothing could be easier than growing them in your living room.
The first step in growing vegetables at home is to buy them.
You eat them as usual and above all, you save the leftovers to grow more, endlessly.
It's as simple as that. You recycle your vegetables and no longer need to buy them!
Plus, you don't even have to have a green thumb: these vegetables don't require much attention. They grow on their own, without the need to plant seeds.
To grow vegetables endlessly, just follow a few steps and follow certain rules. Look :
1. Growing a pineapple
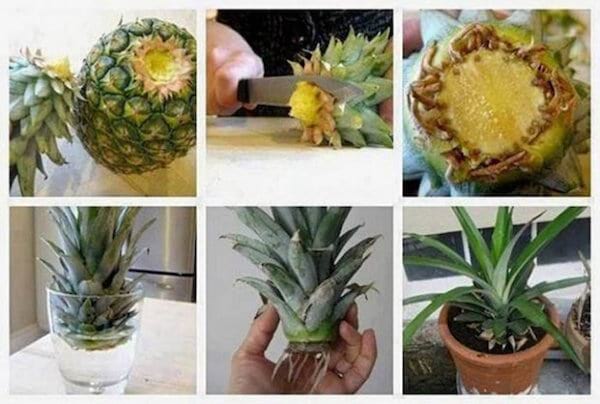
Do you like pineapples? Obviously, to taste it, you peel it carefully, cut the leaves and throw them away.
And yet, it is precisely this part, with the leaves, that must be carefully preserved to grow many other pineapples.
Instead of throwing the part with the leaves in the trash, plant it and it will give you a new plant.
For it to work well, you have to choose a pineapple that is not too ripe. That way, the leaves are very green, in great shape and not dry at all.
If the leaves are dry and already yellowed, there is little chance that you will be successful in growing it.
So if you prefer very juicy and sweet pineapples, cut the leaves when it is still young, wrap it in cling film and keep it in the fridge while it ripens.
And in the meantime, you can grow your pineapple. To do this, cut the top of the fruit and place the cut part in the water.
Your pineapple needs a lot of light so give it a treat and place it near a window.
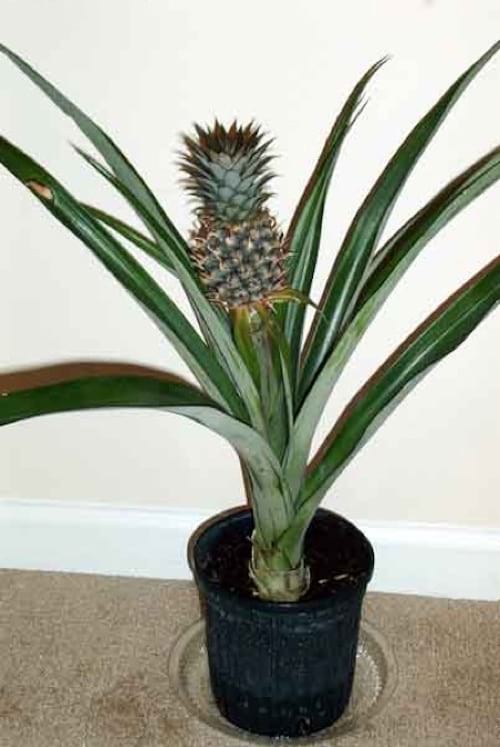
Don't be concerned if you find that the leaves are turning yellow over time. This is completely normal.
Moreover, if you are an observer, you will see new small green leaves appear in the center.
Proof that your pineapple is alive and well! Little by little, these little leaves will take the place of the other leaves.
After about a month, young roots will start to appear.
Now is the time to plant your pineapple in a pot. But first, don't forget to remove the dead leaves. Because they have become useless.
They come off very easily. If you leave them, your plant could even rot.
All you have to do is wait for your pineapple to grow at its own pace. When it grows, put it in a bigger pot.
You'll see, it's very pretty and what's more, it's super good!
Follow this tutorial here to successfully grow your pineapples at home.
2. Spread a salad
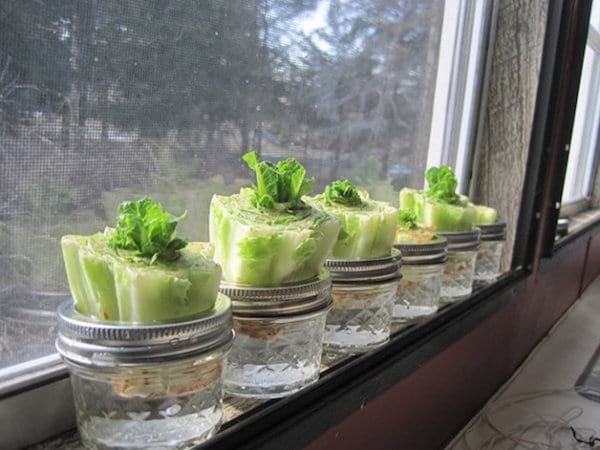
Are you making a salad for your meal? Whether you bought it in a store or picked it up in your vegetable garden, keep it safe.
You will be able to make it go again and have a new salad.
To do this, cut the leaves of the salad. Then cut the foot about 2 or 3 cm from the end. Place this piece in a container filled with water.
For your salad to grow again, 2 conditions must be met: the end of the salad must be half submerged and he must benefit from a lot of light.
If you find that there is less water, add more. Now we have to wait! In 15 days, small roots and buds will appear.
At this point, put your salad in a jar and remove the dead leaves.
Take only the dead leaves and be careful not to remove the small buds hidden between the leaves as well.
There you go, you're going to have salad indefinitely, home grown without chemicals!
Follow this detailed tutorial to successfully grow your salads at home.
3. Growing asparagus
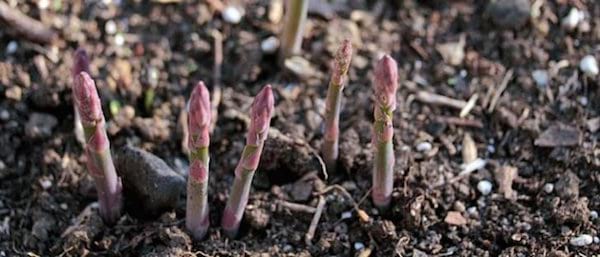
Asparagus is almost a luxury to eat, so expensive.
But if you can grow them at home for free, why not?
With a simple vinaigrette, it's a real treat for the taste buds.
And when they grow, it is a pleasure for the eyes because the plant is pretty and original. A great natural decor!
On the other hand, you have to know how to be patient before tasting them. But the great thing is, once they've sprouted, they poke their noses up every year for you to feast on.
To grow them, there are several solutions: you collect roots (asparagus claws) from a friend who grows them or in a garden center or you get them from roots.
In any case, moisten them by soaking them in water and plant them quickly, every 50 to 60 cm, spreading the roots well. Spring is the best time for this.
You will still have to wait 1 to 2 years before enjoying your work. But then you will feast on it every year. Worth it, isn't it? Follow this tutorial, to succeed in growing them.
4. Growing garlic

Did you know that you don't need seeds to grow garlic?
By the way, you may have noticed that you can't find garlic seeds in garden centers? This is because by dint of cultivating them, they are no longer fertile.
So to grow garlic, you just need to plant a clove of garlic in the ground.
In addition, no need to wait for the pod to germinate. She just has to be beautiful and in good shape!
But if you have sprouted garlic then you can use it to plant it.
When the plant has grown, cut the stem and dig up your clove which will have turned into a head of garlic. All you have to do is eat it ... and start over.
In addition, you will be surprised to find that garlic flowers are beautiful plants that smell good! Find out how to grow garlic at home here.
5. Growing fresh basil
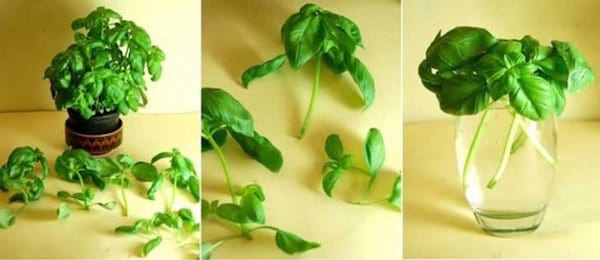
Nothing could be easier than growing basil at home!
To do this, just take a few beautiful stems of about 10 cm then fill a glass with water and put them in it.
Then place the glass near a window so that your basil gets as much sun as possible.
Roots will soon appear. Wait until they are about 2 cm to put your stems in a pot or in a planter.
You will soon just have to reach out to feast on its flavors in a strawberry and basil tartare or to make it a mosquito repellant.
Follow this tutorial here to successfully grow your basil at home.
6. Growing mushrooms
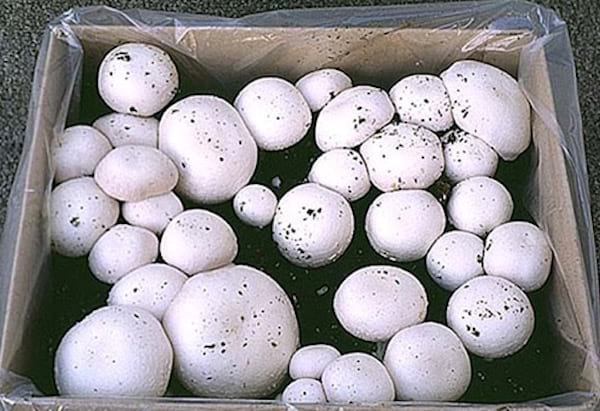
It is true that it is not the easiest culture to do at home because it requires special conditions.
Indeed, you must first plant your mushrooms in soil mixed with compost or coffee grounds.
And then they must be stored in a humid and cool place at night.
You may experience multiple failures. But don't be discouraged!
Growing mushrooms has to be earned. But your efforts will eventually pay off.
Follow this tutorial to successfully grow your mushrooms on compost or this one to grow them on coffee grounds.
7. Growing tomatoes
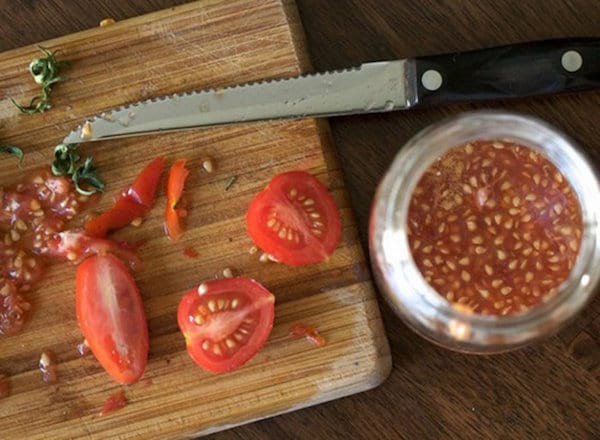
Here is a magic recipe to have tomato plants quickly.
Just take a tomato or two, an empty plastic bottle, small stones, potting soil, newspaper and finally a large black plastic bag.
To start, cut the tomatoes lengthwise and empty them. Keep the seeds in a safe place.
Then cut the plastic bottle lengthwise. Drill it a few holes so that the water can drain out. Put a few stones at the bottom of the bottle.
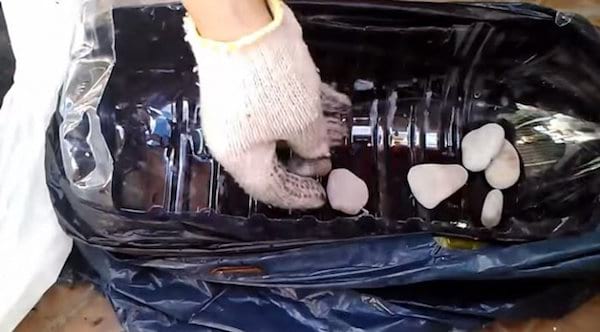
Pour the soil into this container and place the seeds. Space them out without scattering them too much. Then cover the seeds with a thin layer of soil. Do not add too much so that the seeds can easily come out.
The next step is to wet two sheets of newspaper. Wring them out a bit so that the newspaper is not too wet. Then place them on the ground so as to cover it completely.
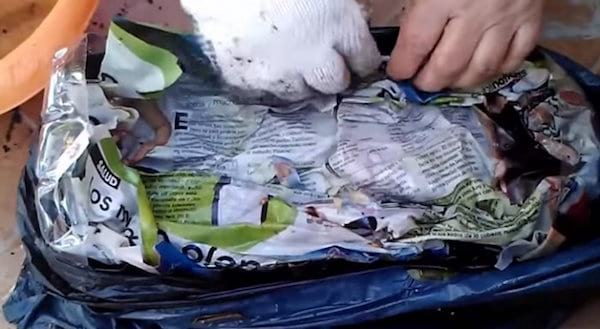
Put the whole thing in the plastic bag and seal it tightly. The role of the bag is to retain moisture, as if it were a small greenhouse.
After 4 or 5 days, you can open your homemade greenhouse. The newspaper should still be damp.
And surprise! The seeds have germinated. You can now transpose them into pots, just like any tomato plant.
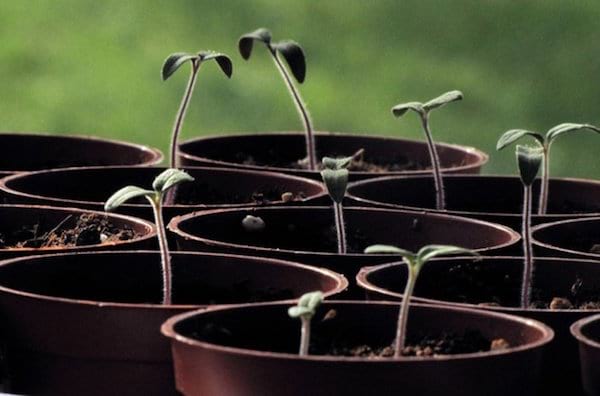
You can then place them on your balcony. Avoid overwatering them to avoid rotting the roots.
Discover the world's easiest way to grow tomatoes here.
8. Growing cilantro
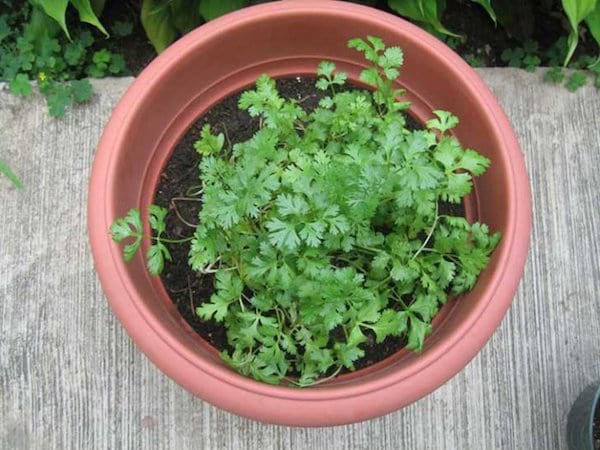
Cilantro has peculiar smells and flavors. It is delicious in exotic dishes.
Growing it directly in your kitchen makes life easier to prepare good meals!
The process is just as simple as growing basil.
Soak a few sprigs of coriander in a glass of water so that the roots start to grow.
When the roots are big enough, it's time to find a pot for your cilantro.
It will flourish there and give you beautiful leaves after a few weeks.
After a few months, you will have free cilantro at home.
Follow this detailed tutorial to successfully grow cilantro.
9. Growing onions
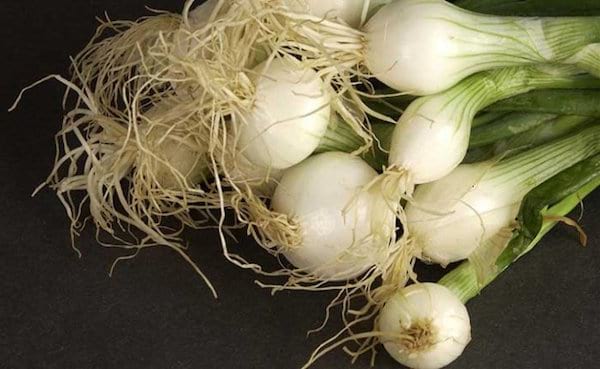
You will be surprised how easy it is to grow onions at home!
With a simple bulb, you can have a whole white onion in just a few days.
To grow onions at home, eat only the top part and keep about 3 cm from the bottom part of the bulb with the roots.
Put this part in a glass of water. In 1 week, you will have beautiful white onions again! Easy, isn't it?
And it also works with spring onions. Check out the trick here.
10. Growing ginger from a small piece of ginger
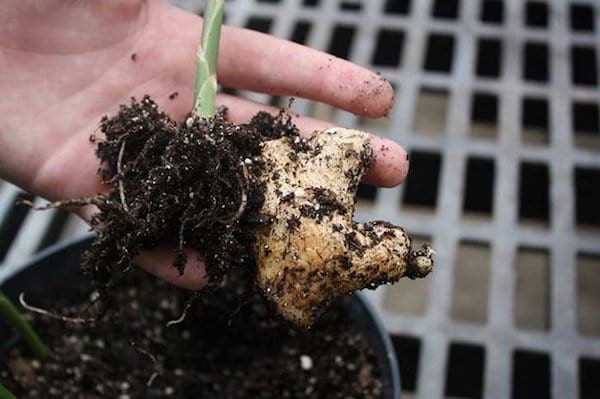
Ginger is a root, like potato and garlic.
If you want to have ginger at home, you just need to plant a small piece of ginger in the ground.
The root will grow and maybe even duplicate. As long as you give it enough time and space!
Because ginger takes its time to grow. It takes several months for it to germinate and finally emerge from the earth.
But after 8-10 months you have a gorgeous ginger plant. Find out here how to grow unlimited amounts of ginger at home.
11. Growing carrots from leftover carrots
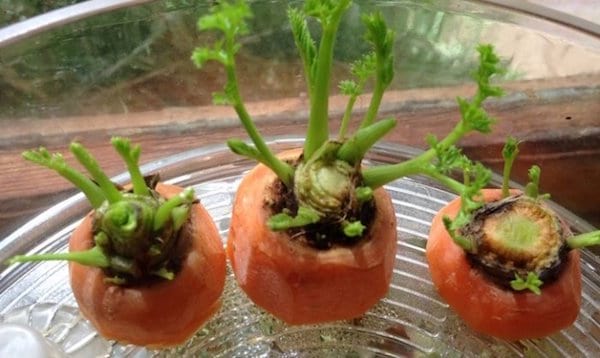
To grow carrots without using seeds, it's simple. Just cut off the top of the carrot, the part you don't eat, and submerge it in the water, up to halfway.
Wait a few days to see how your carrot is developing. It may be, alas, that it gives nothing and that the tip of carrot rots.
Suddenly, it is better to use several pieces of carrots, to have more chances of success.
You will know it worked when you see small buds appear, after 7-10 days.
Wait until the stems are 3 or 4 cm before replanting them in the ground. It is necessary to choose a deep container so that the carrots can develop well.
A plastic bottle will do. Just cut off the top of the bottle and pierce the bottom.
Pour the earth into your improvised pot and put the small piece of carrot in it. Cover it with soil so that only the stems protrude.
Tamp the earth a bit and soon you will have some nice carrots to taste.
Follow this tutorial here to successfully grow your carrots.
Results
There you go, you know how to grow your vegetables yourself, from leftover vegetables :-)
No more buying your vegetables! You will be able to grow them indefinitely at home.
You will eat good vegetables grown without chemicals and in addition, you will save money.
Your turn...
Have you tried growing new vegetables from leftover vegetables? Let us know in the comments if it worked for you. We can't wait to hear from you!
Do you like this trick ? Share it with your friends on Facebook.
Also to discover:
The 20 Easiest Vegetables to Grow IN A POT.
10 Vegetables You Can Grow In Your Home Endlessly!